cPanel
It's quite hard to debug any deployment issue on the cPanel or any managed server as the provider manages this type of server, and they've complete control of the server. And for that, We don't recommend Cpanel or any managed server for deployment. We suggest you use any VPS server where you have complete control of it. you can purchase any $5 – $10/mo server from amazon lightsail, ec2 or digitalocean or any ubuntu server
If you still decide to proceed with panel based server, our support team won't be able to help you. We have put some resources for Cpanel in this documentation section to help our users to get started but other than that, we don't have much to offer with Cpanel or any Managed Server
Access Server
To install the API, access the server using the cPanel terminal first,
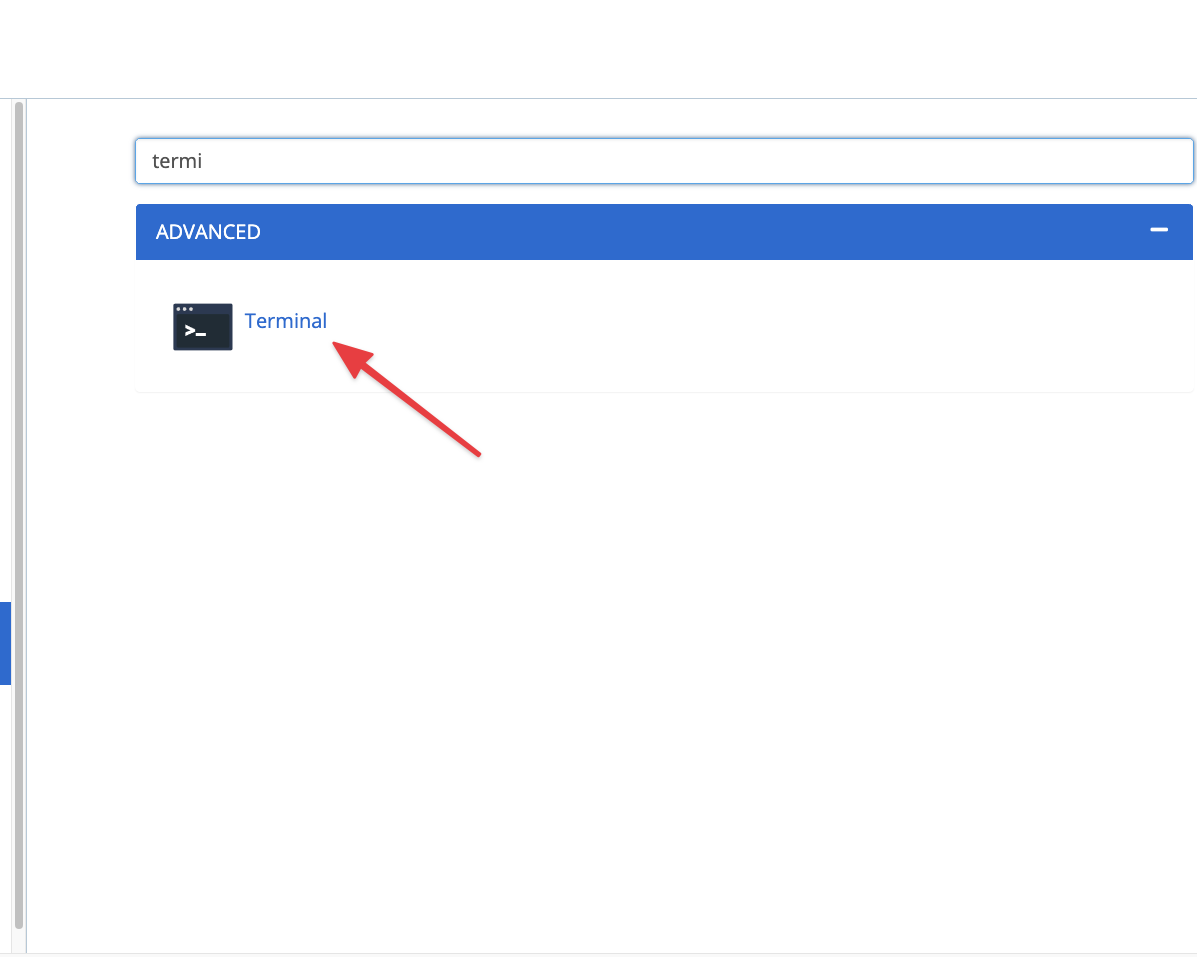
If you don't find the terminal, then login to your local computer terminal or putty for Windows using SSH.
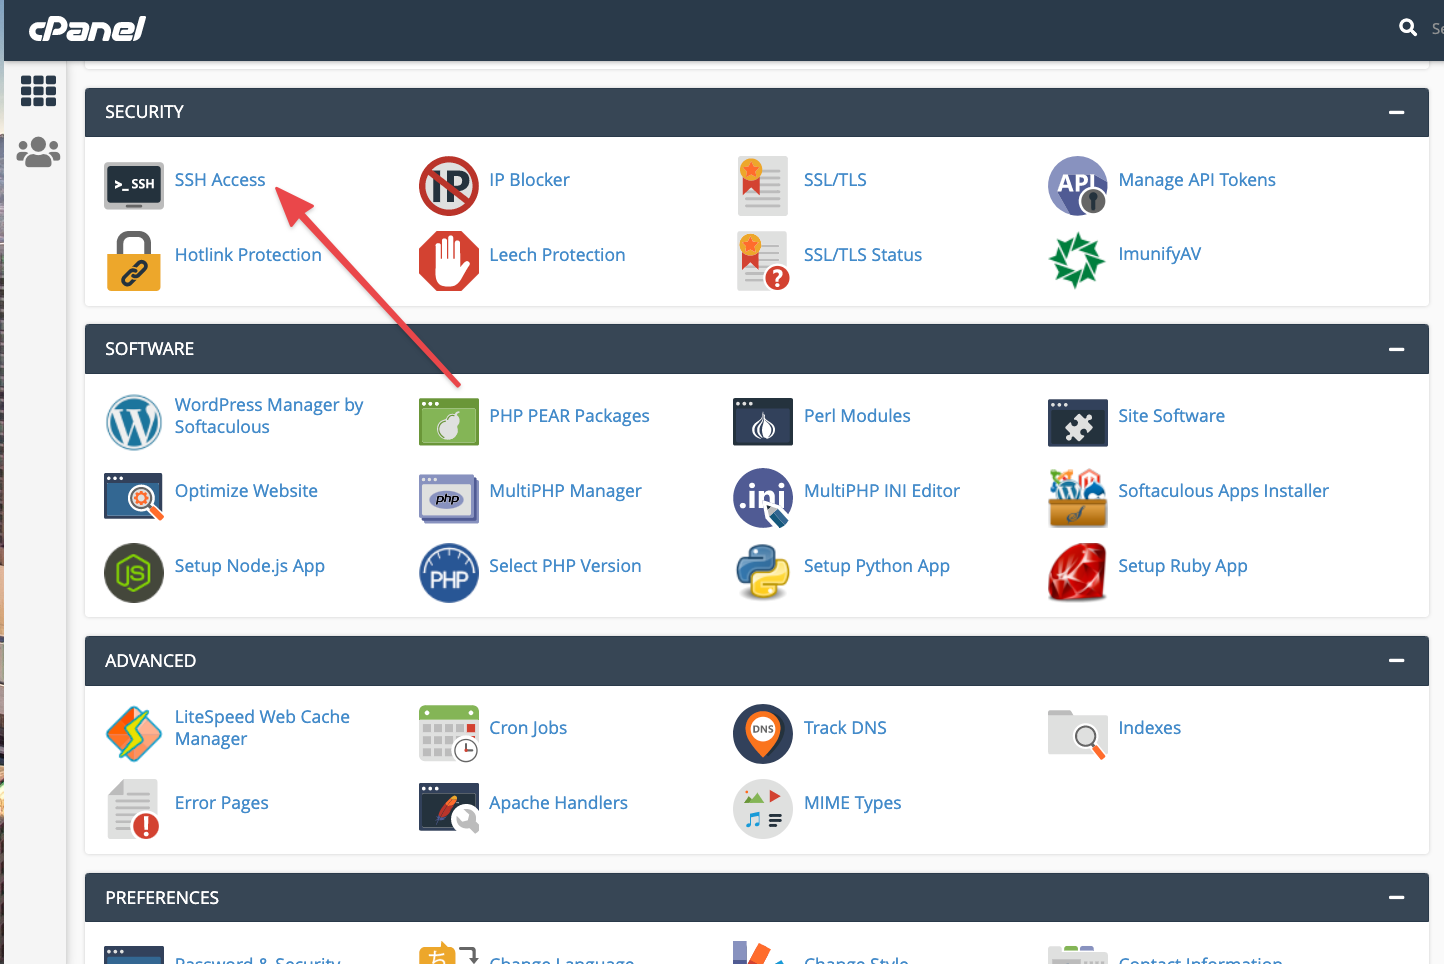
After enabling the ssh login to your server using ssh,
If you dont't see any option, then contact your hosting provider as cPanel control by hosting provider.
After logging in, Check if the composer is already installed or not using this command,
composer -v

If composer is not installed then, install composer to your server.
Check this YouTube Video for install composer on your server,
After that, check the PHP version using,
php -v
make sure it's 8.1
Create Subdomains
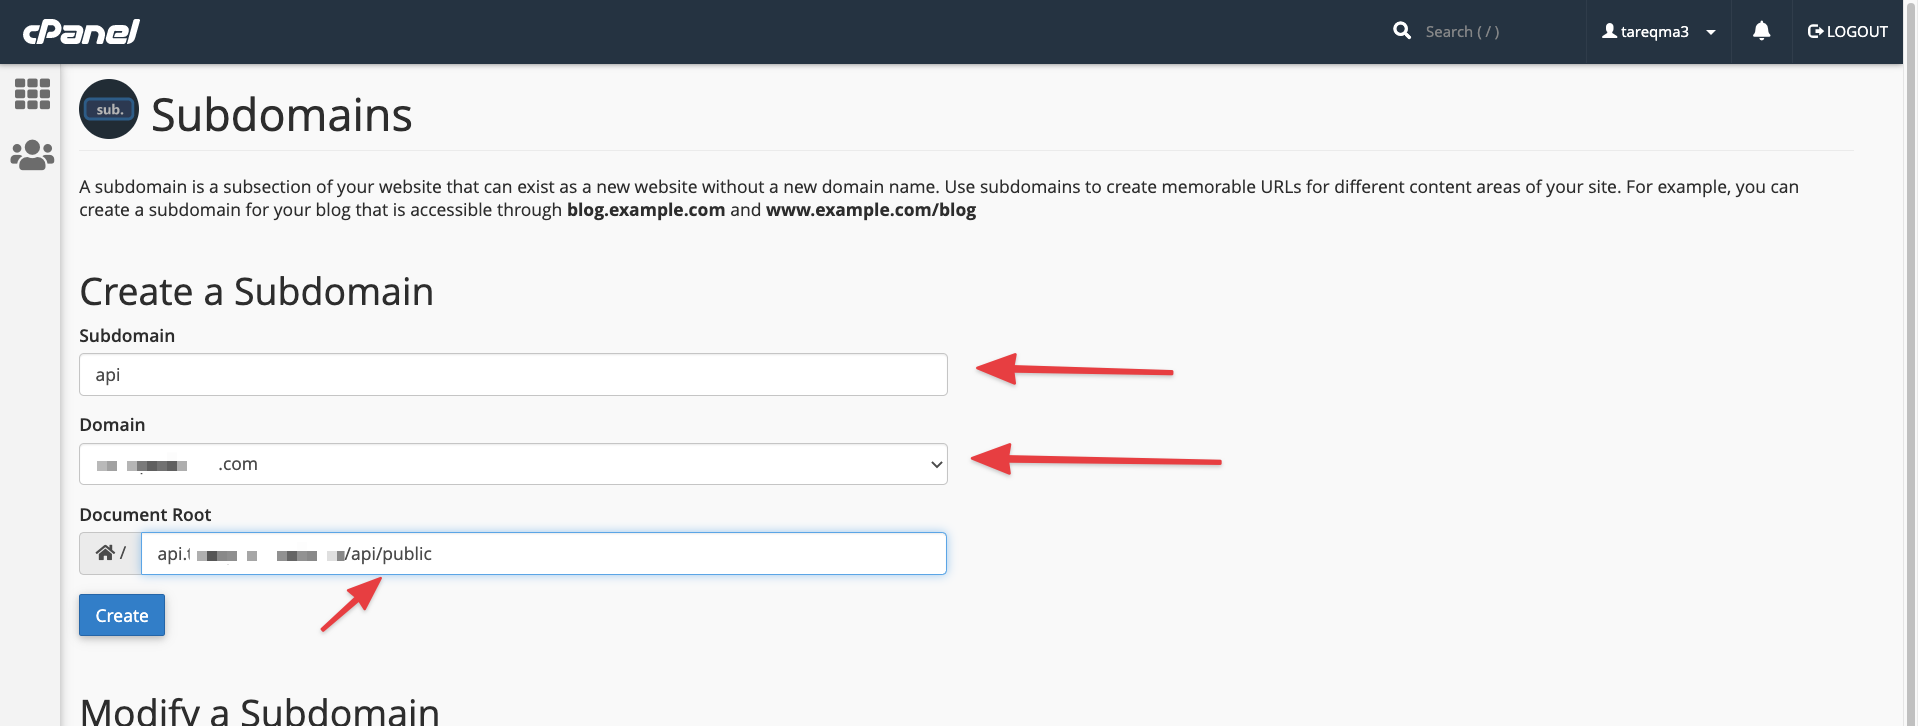
Now create two subdomains, for example,
-> your_domain.com -> host frontend store.-> api.your_domain.com -> host laravel API.-> admin.your_domain.com -> host admin dashboard.
Or if you want to host all the script on subdomains, then create subdomains like this,
-> store.your_domain.com -> host frontend store.-> api.your_domain.com -> host laravel API.-> admin.your_domain.com -> host admin dashboard.
After creating domain/subdomains, make sure all the domain/subdomains are HTTPS enabled. Please contact your hosting provider to enable this, as most hosting providers provide some sort of free SSL.
Install API
- Extract the
pickbazarpackage that you download fromCodeCanyon. - On that folder, you'll get another
zipcalledpickbazar-laravel.zip. - Now extract this
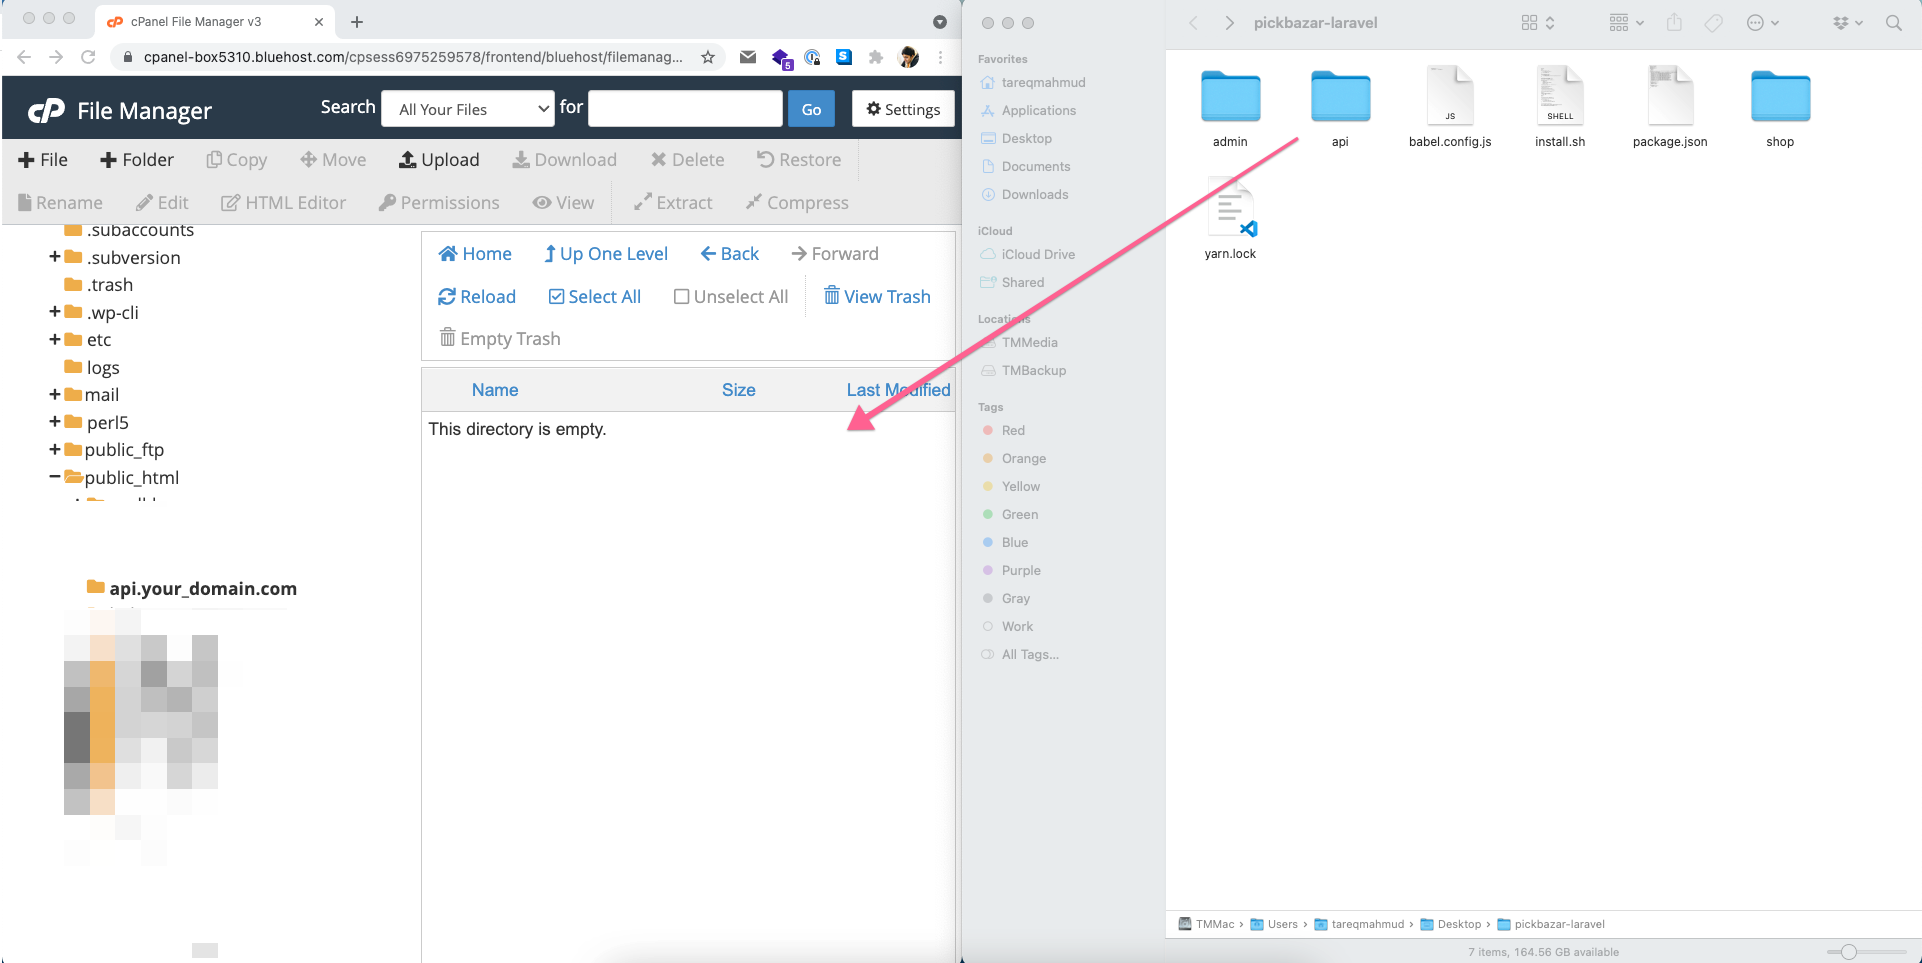
pickbazar-laravel.zipfile. - On that file, you'll get a folder called
api
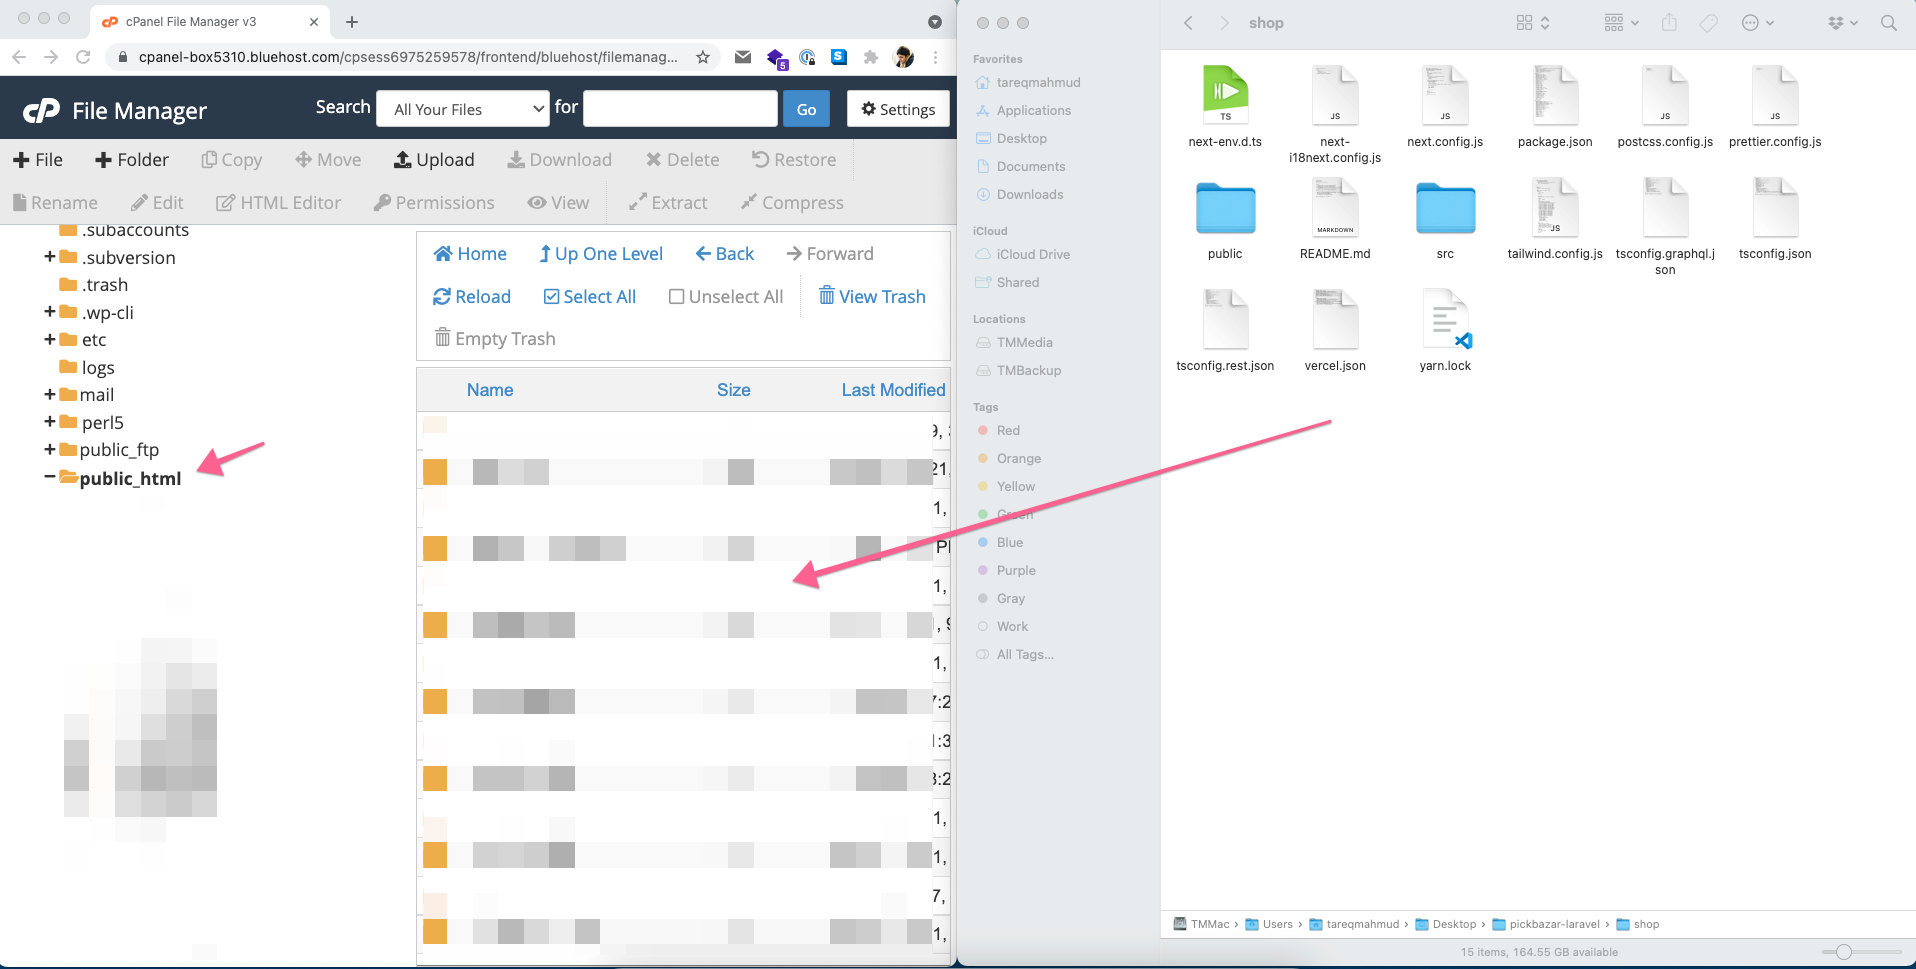
Now upload this api folder to the api.your_domain.com folder in your server
Make sure your
api.your_domain.comsubdomainDocument Rootpoints to thatapi/publicfolder.
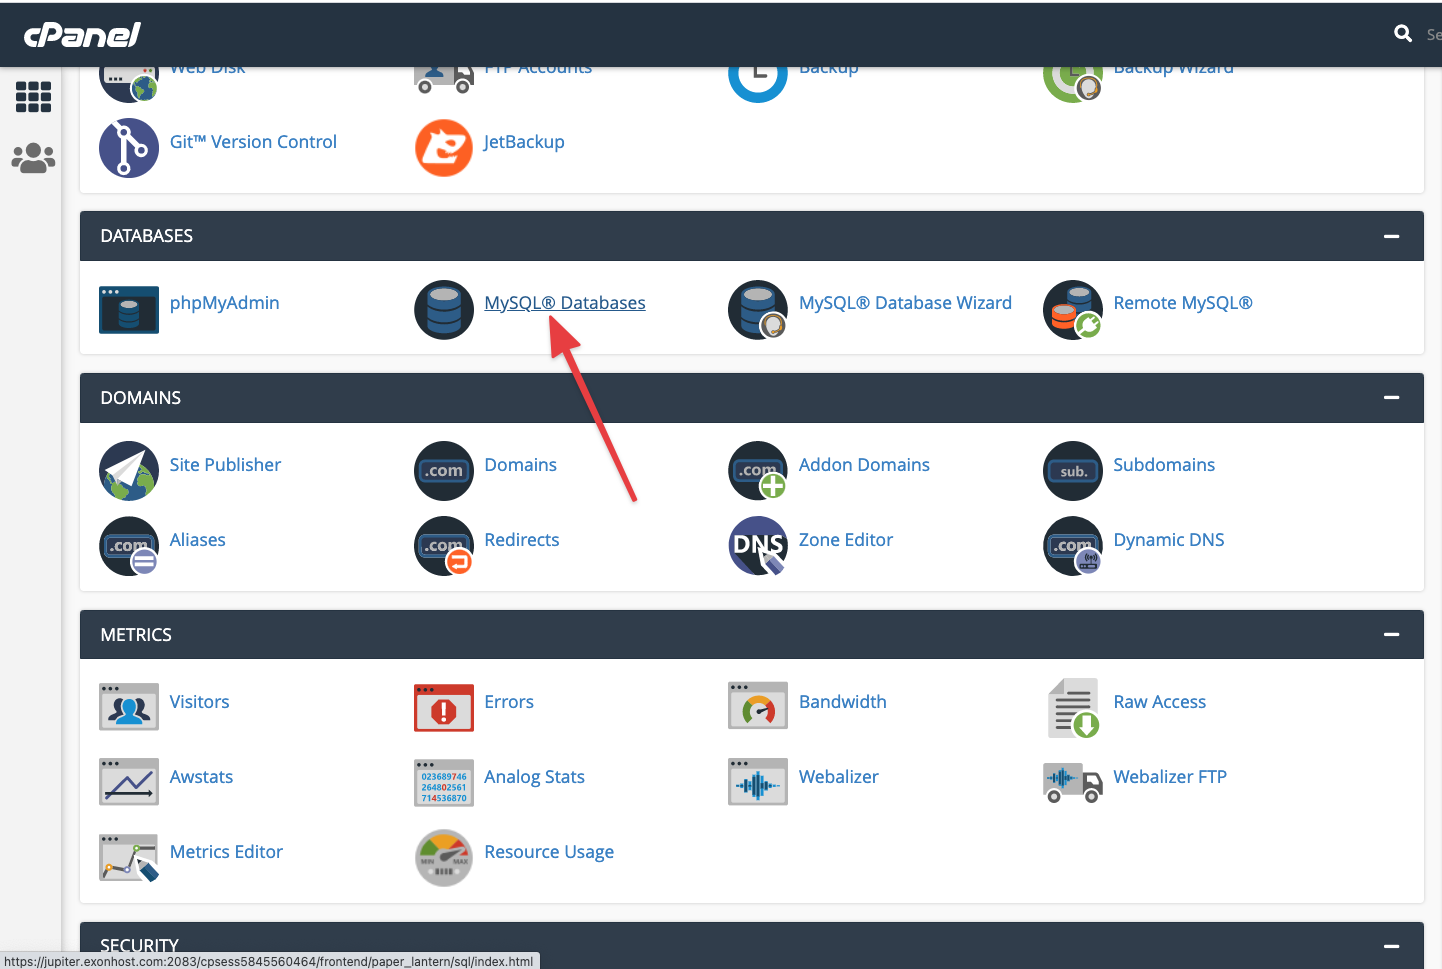
Now create a MySQL database and user from MySQL wizard
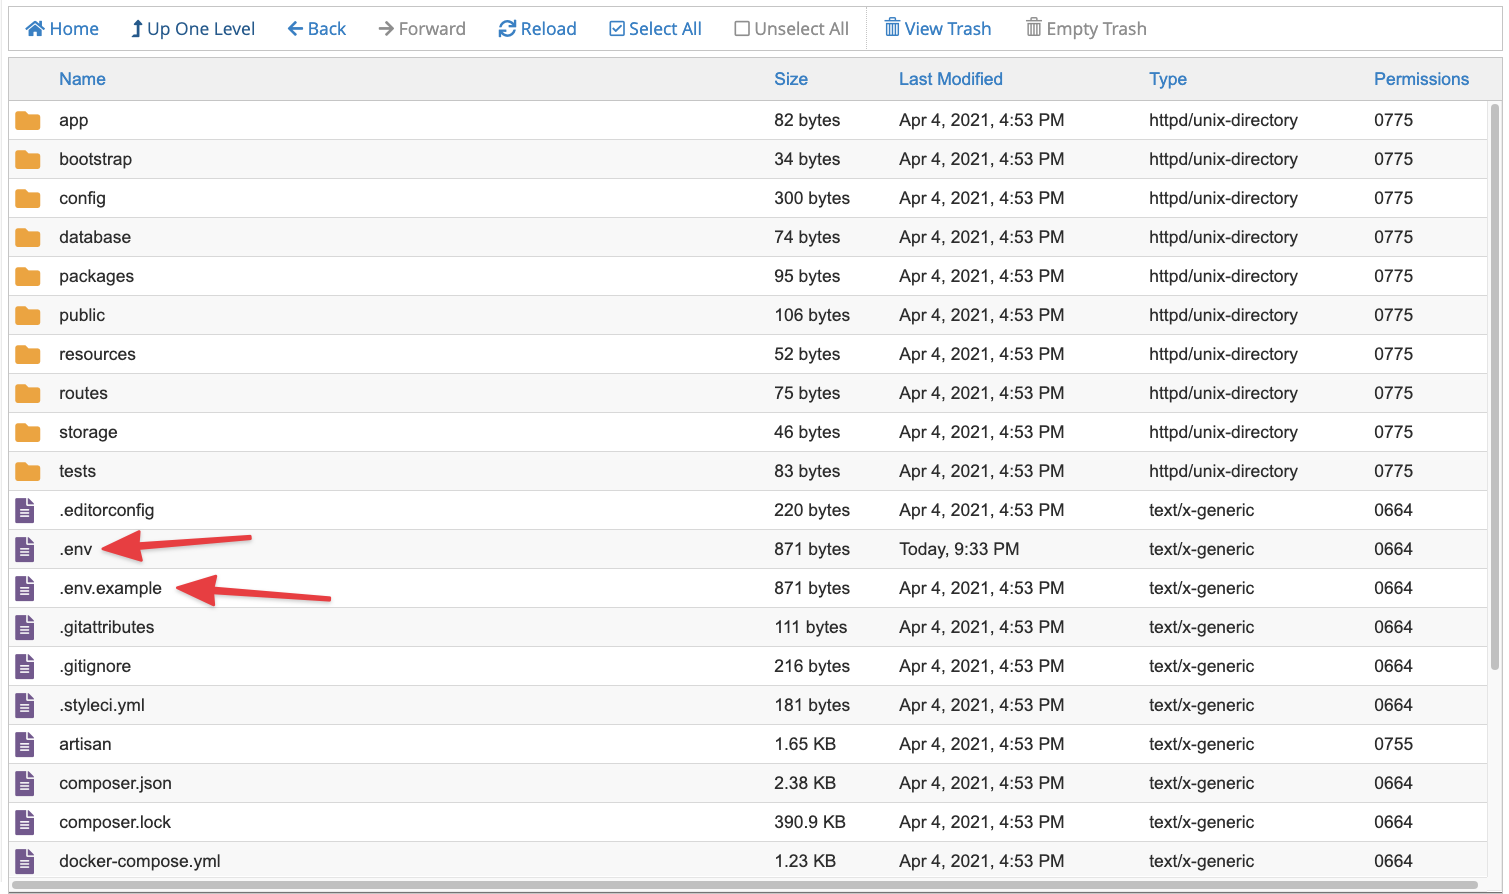
After creating the MySQL database, go to your api folder from your cPanel file manager and copy .env.example to .env.
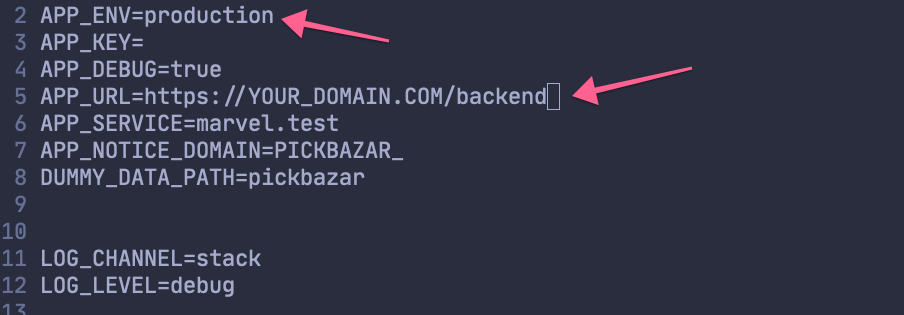
After the copy, edit .env and add MySQL credentials,
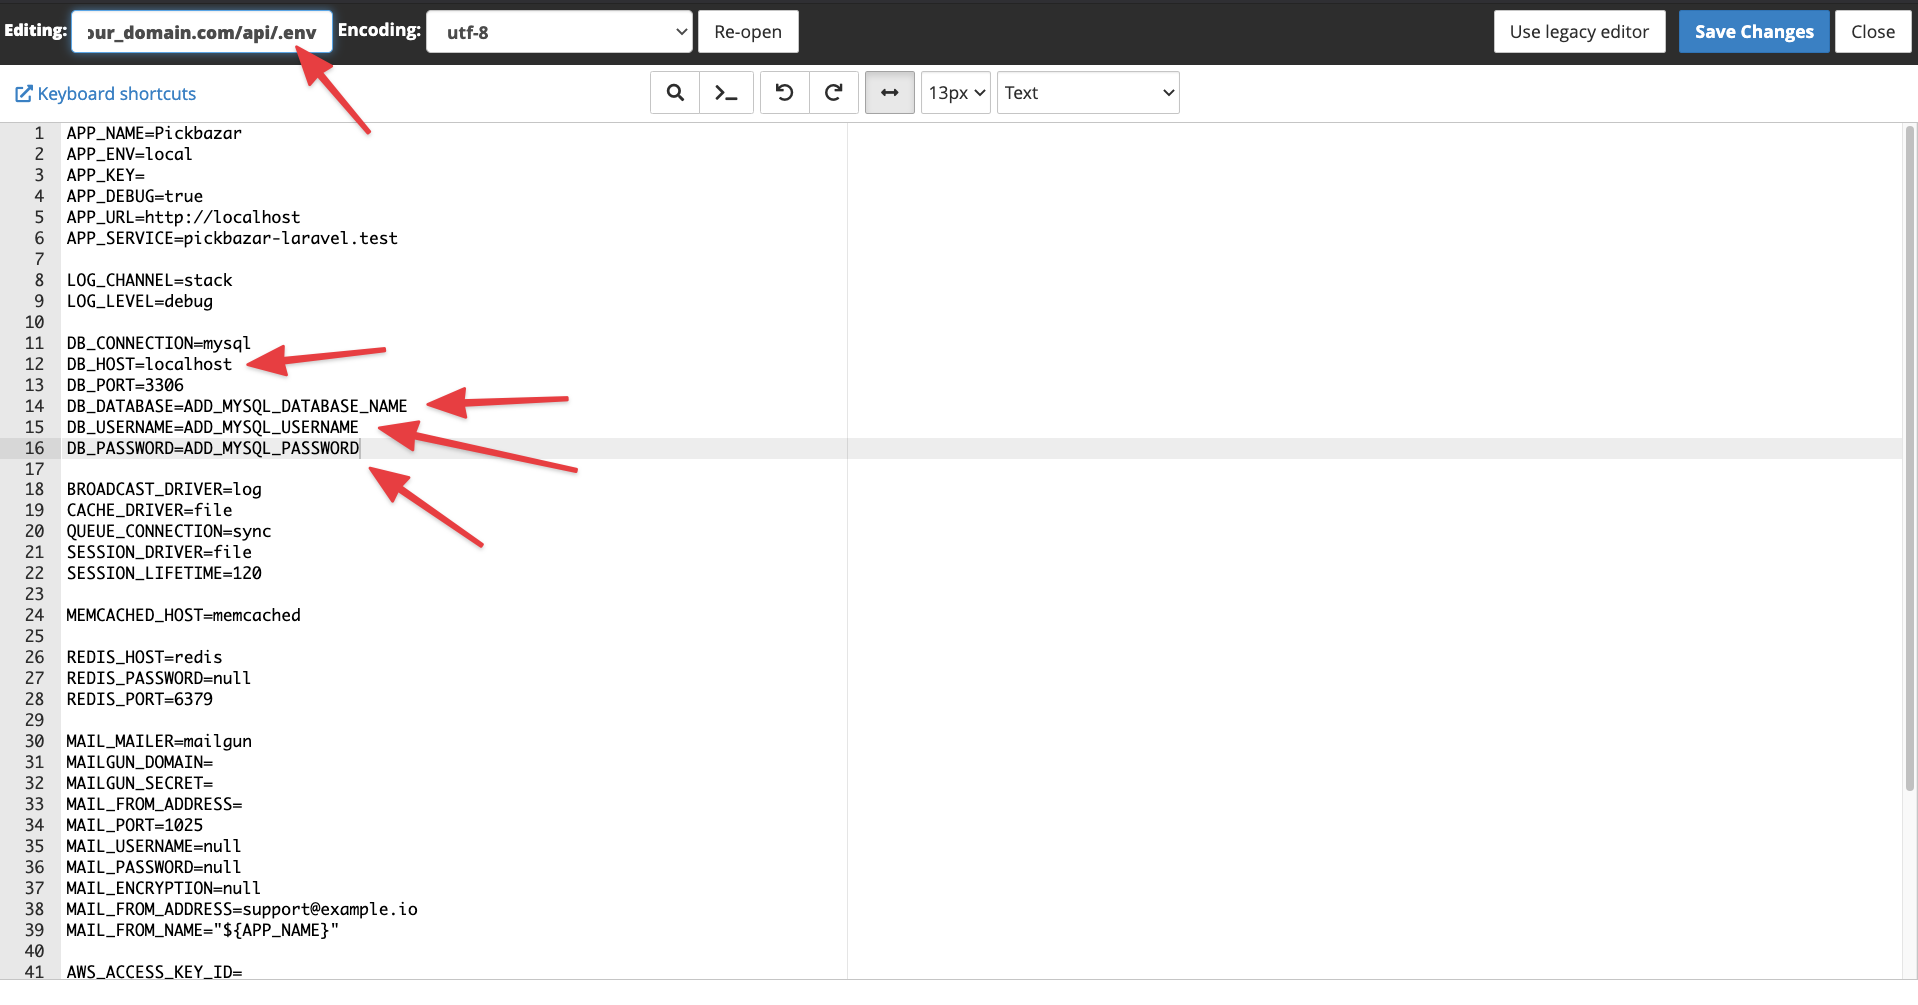
Also, add https://YOUR_DOMAIN.COM/api to APP_URL. Without this, the upload function will be broken.
Then go to your ssh terminal again and,
go to api folder and run,
composer install
If composer installs all the packages successfully, then run this command on the api folder,
php artisan key:generatephp artisan marvel:install
You'll get several confirmations for migration, dummy data, and admin account. Make sure you check the confirmation step and take the necessary actions based on your requirement.
After that, run this command to link storage,
php artisan storage:link
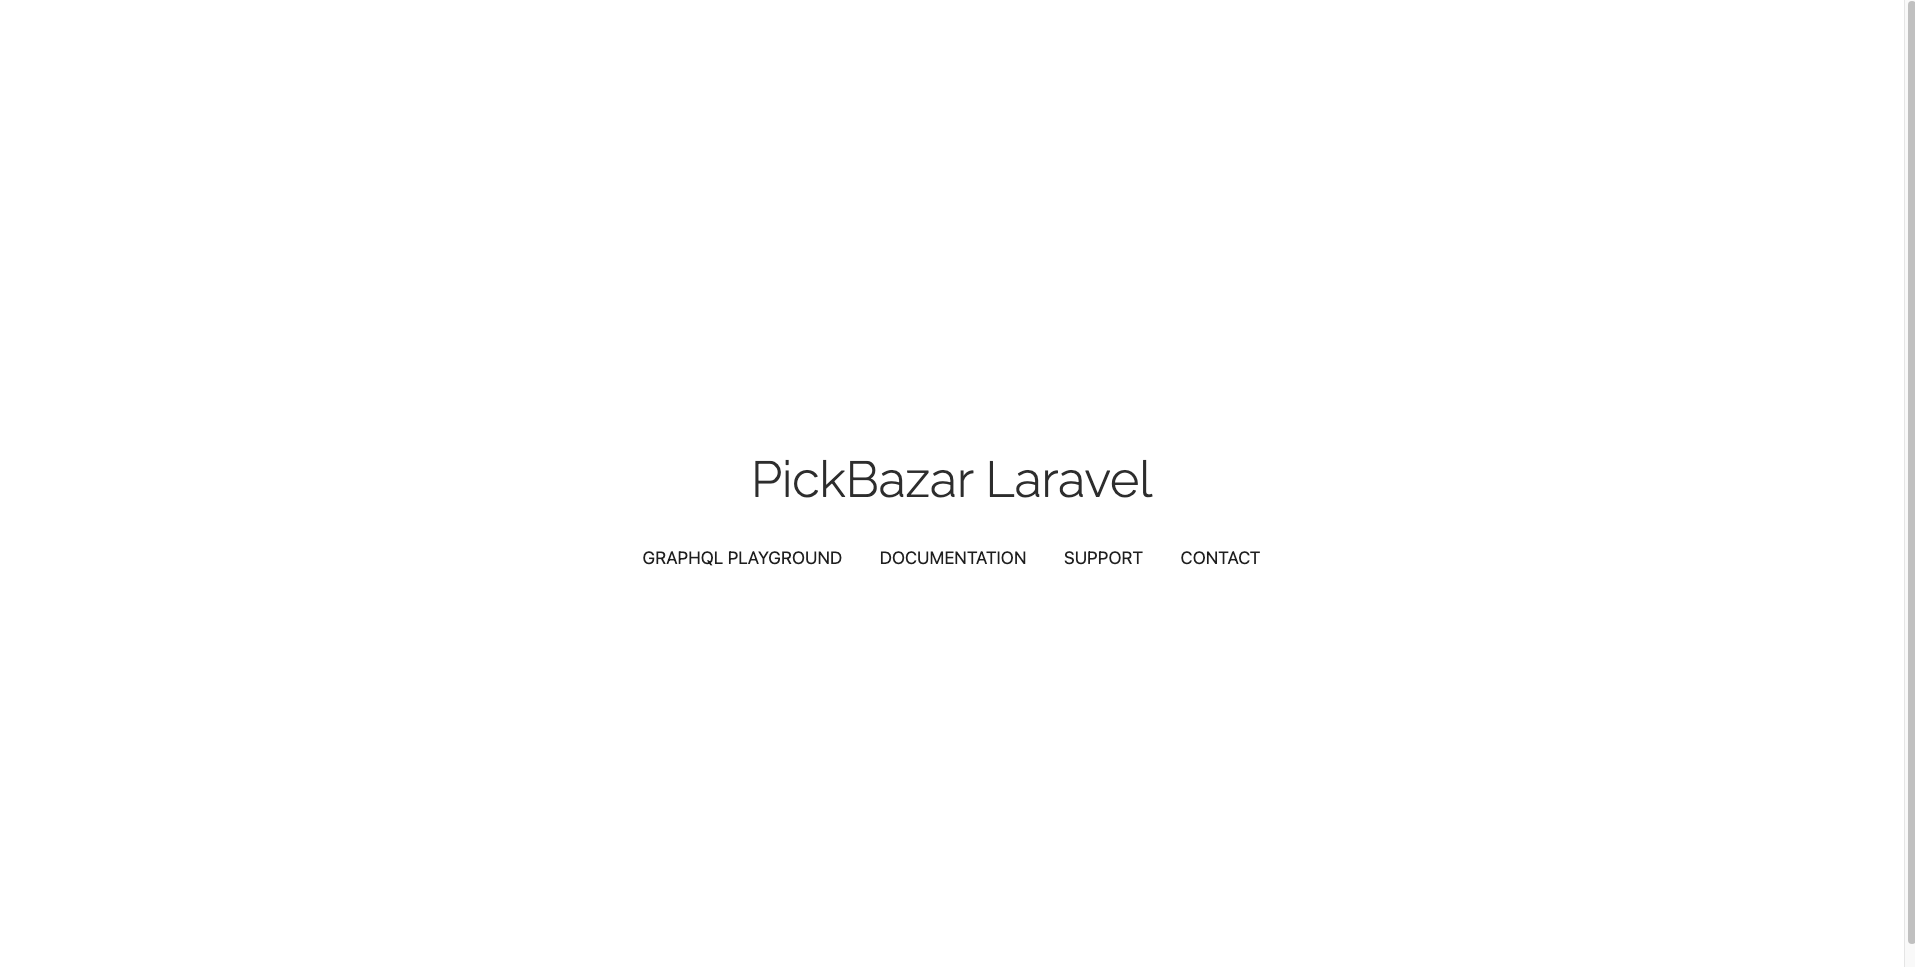
After install, go to your api.your_domain_name.com, and you'll get a webpage like this,
Install FrontEnd
Before proceeding next step, make sure you already create two subdomains like this,
-> your_domain.com -> host frontend store.-> admin.your_domain.com -> host admin dashboard.
OR
-> store.your_domain.com -> host frontend store.-> admin.your_domain.com -> host admin dashboard.
FrontEnd Project Build
It's not possible to run both REST and GraphQL versions at the same time. So make sure to follow only the
For RESTsection orFor GraphQLsection.
Typescript requires a huge chunk of memory to build the project, so if your server has at least 8gb+ of memory, then you can build the project on your server directly. If not, then build the project on your server, then move the folder to the server then serve the project. We'll do the second method in this tutorial.
We'll suggest you build the frontend part on your computer and then upload the build file to the server.
step 1 - Build Custom Server
go to your pickbazar-laravel folder
shop rest
Create custom server for shop rest,
nano shop/server.js
and paste this code,
// server.jsconst { createServer } = require('http')const { parse } = require('url')const next = require('next')const dev = process.env.NODE_ENV !== 'production'const app = next({ dev })const handle = app.getRequestHandler()app.prepare().then(() => {createServer((req, res) => {// Be sure to pass `true` as the second argument to `url.parse`.// This tells it to parse the query portion of the URL.const parsedUrl = parse(req.url, true)const { pathname, query } = parsedUrlif (pathname === '/a') {app.render(req, res, '/a', query)} else if (pathname === '/b') {app.render(req, res, '/b', query)} else {handle(req, res, parsedUrl)}}).listen(3003, (err) => {if (err) throw errconsole.log('> Ready on http://localhost:3003')})})
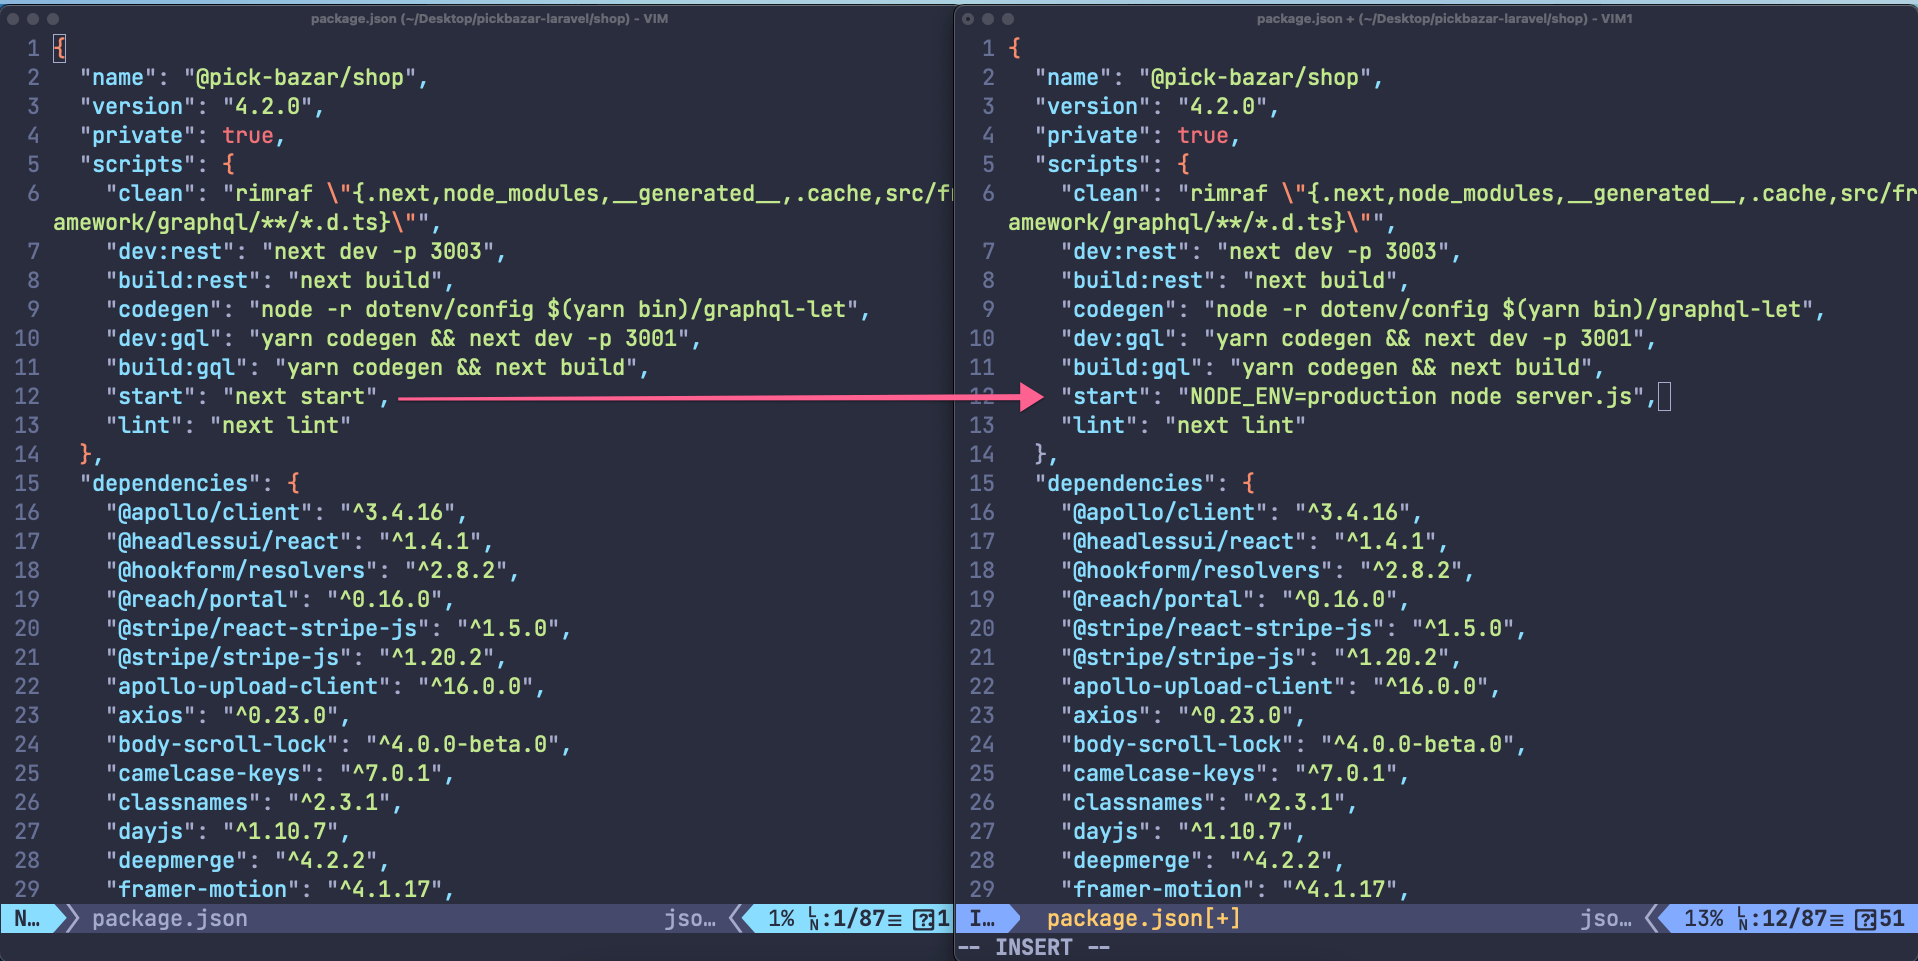
Now update package.json for shop rest,
nano shop/package.json
and replace start script with this,
"start": "NODE_ENV=production node server.js"
admin rest
Similarly, create custom server for admin rest,
nano admin/rest/server.js
and paste this code,
// server.jsconst { createServer } = require('http')const { parse } = require('url')const next = require('next')const dev = process.env.NODE_ENV !== 'production'const app = next({ dev })const handle = app.getRequestHandler()app.prepare().then(() => {createServer((req, res) => {// Be sure to pass `true` as the second argument to `url.parse`.// This tells it to parse the query portion of the URL.const parsedUrl = parse(req.url, true)const { pathname, query } = parsedUrlif (pathname === '/a') {app.render(req, res, '/a', query)} else if (pathname === '/b') {app.render(req, res, '/b', query)} else {handle(req, res, parsedUrl)}}).listen(3002, (err) => {if (err) throw errconsole.log('> Ready on http://localhost:3002')})})
Now update package.json for admin rest,
nano admin/rest/package.json
and replace start script with this,
"start": "NODE_ENV=production node server.js"
admin graphql
Skip this step if you want to use REST API
Create custom server for admin graphql,
nano admin/graphql/server.js
and paste this code,
// server.jsconst { createServer } = require('http')const { parse } = require('url')const next = require('next')const dev = process.env.NODE_ENV !== 'production'const app = next({ dev })const handle = app.getRequestHandler()app.prepare().then(() => {createServer((req, res) => {// Be sure to pass `true` as the second argument to `url.parse`.// This tells it to parse the query portion of the URL.const parsedUrl = parse(req.url, true)const { pathname, query } = parsedUrlif (pathname === '/a') {app.render(req, res, '/a', query)} else if (pathname === '/b') {app.render(req, res, '/b', query)} else {handle(req, res, parsedUrl)}}).listen(3000, (err) => {if (err) throw errconsole.log('> Ready on http://localhost:3000')})})
Now update package.json for admin graphql,
nano admin/graphql/package.json
and replace start script with this,
"start": "NODE_ENV=production node server.js"
shop graphql
You can skip this step if you want to use REST API
Create custom server for shop graphql,
nano shop/server.js
and paste this code,
// server.jsconst { createServer } = require('http')const { parse } = require('url')const next = require('next')const dev = process.env.NODE_ENV !== 'production'const app = next({ dev })const handle = app.getRequestHandler()app.prepare().then(() => {createServer((req, res) => {// Be sure to pass `true` as the second argument to `url.parse`.// This tells it to parse the query portion of the URL.const parsedUrl = parse(req.url, true)const { pathname, query } = parsedUrlif (pathname === '/a') {app.render(req, res, '/a', query)} else if (pathname === '/b') {app.render(req, res, '/b', query)} else {handle(req, res, parsedUrl)}}).listen(3001, (err) => {if (err) throw errconsole.log('> Ready on http://localhost:3001')})})
Now update package.json for shop graphql,
nano shop/package.json
and replace start script with this,
"start": "NODE_ENV=production node server.js"
Step 2 - Install & Build
go to your pickbazar-laravel folder
To install all the npm packages run this command,
yarn
Step 3 - Build the project
At first, we've to copy the sample .env.template to production .env for the shop and admin first.
If you want to use REST API., then follow REST Procedure, or if you want to use GraphQL API, then follow GraphQL Procedure
For REST
Go to,
cd shop
then use this command to copy,
cp .env.template .env
Now edit .env and add you API url to .env
nano .env
and use
NEXT_PUBLIC_REST_API_ENDPOINT=https://api.YOUR_DOMAIN.com/
and
FRAMEWORK_PROVIDER="rest"
then copy tsconfig.rest.json content to tsconfig.json
After that, go to the admin -> rest folder,
cd ../admin/rest
then use this command to copy,
cp .env.template .env
nano .env
and use
NEXT_PUBLIC_REST_API_ENDPOINT=https://api.YOUR_DOMAIN.com/
Now go to the pickbazar-laravel folder,
and run,
yarn build:shop-restyarn build:admin-rest
For GraphQL
Skip this step if you want to use REST API
and go to,
cd shop
then use this command to copy,
cp .env.template .env
Now edit .env and add you API url to .env
nano .env
and use
NEXT_PUBLIC_GRAPHQL_API_ENDPOINT=https://api.YOUR_DOMAIN.com/
and
FRAMEWORK_PROVIDER="graphql"
then copy tsconfig.graphql.json content to tsconfig.json
After that, go to the admin -> graphql folder,
cd ../admin/graphql
then use this command to copy,
cp .env.template .env
Again edit .env
nano .env
and use
NEXT_PUBLIC_GRAPHQL_API_ENDPOINT=https://api.YOUR_DOMAIN.com/
Now go to the pickbazar-laravel folder,
and run,
yarn build:shop-gqlyarn build:admin-gql
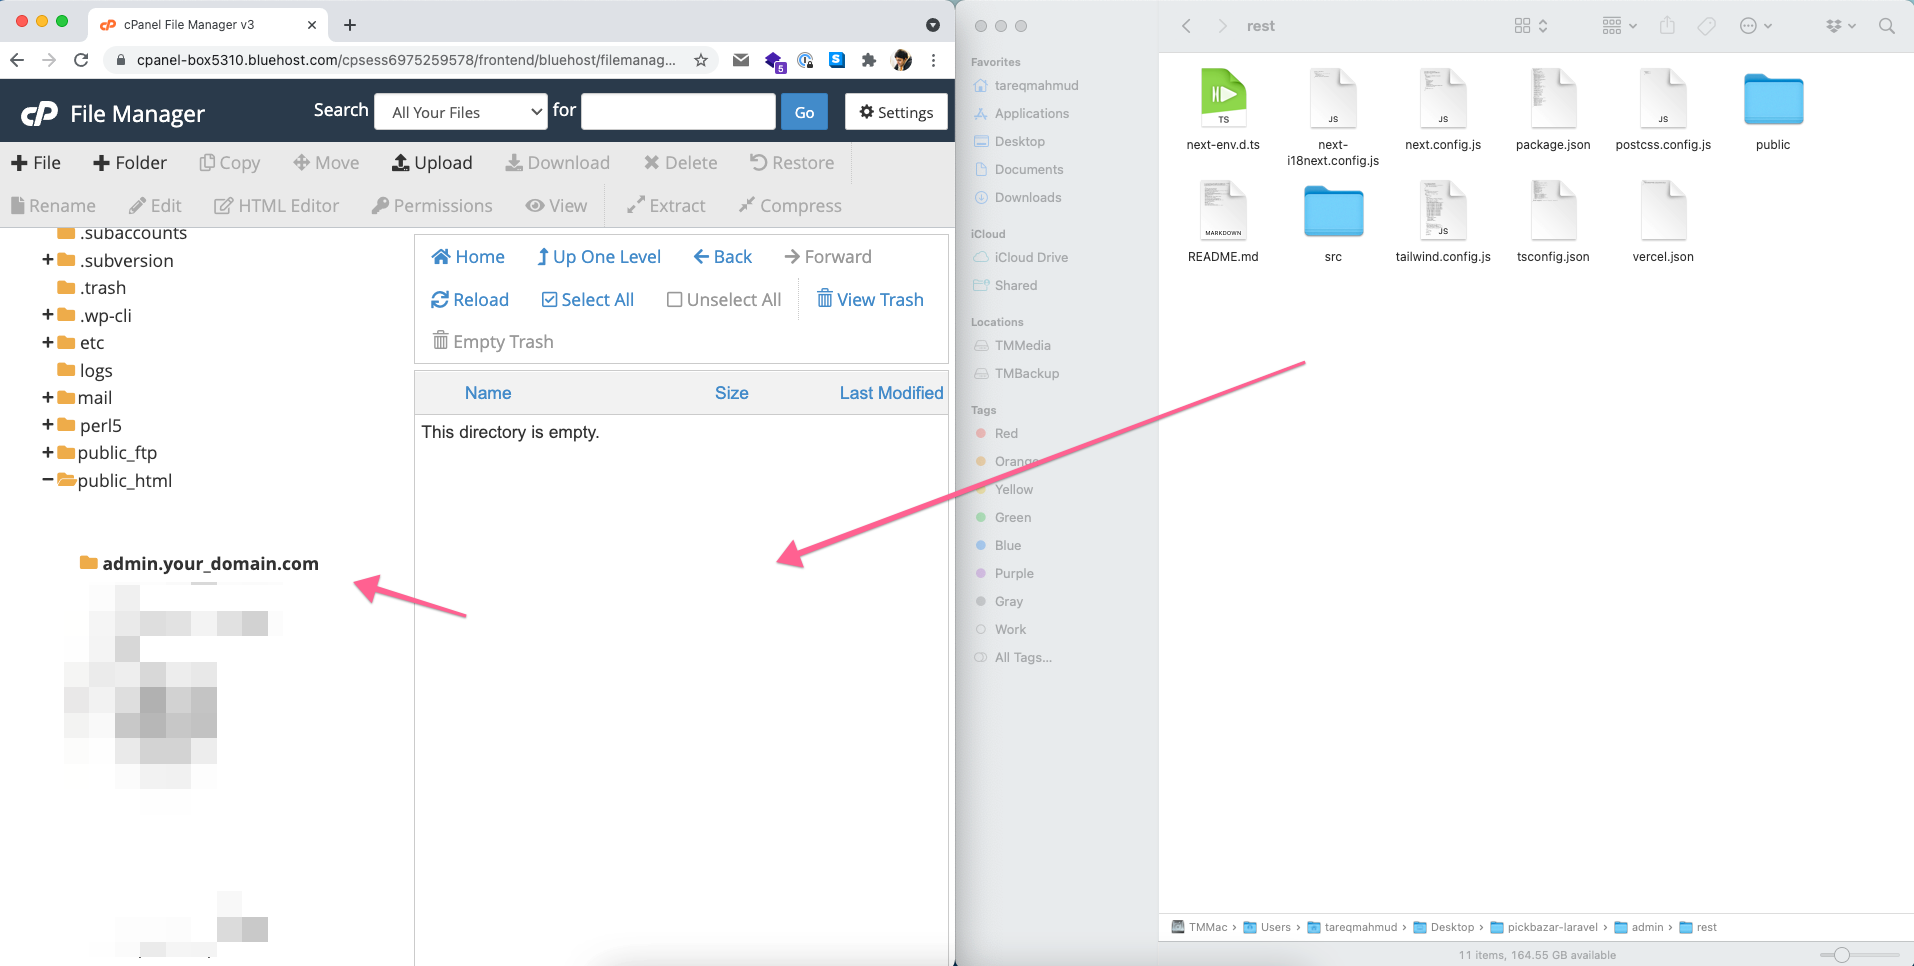
After build the project upload the
shoptoroot_domain -> public_htmlfolderadmin-resttoadmin.your_domain.comfolder
For graphql upload admin-graphql instead of admin-rest
shop,
shop-admin,
Install NodeJs Project
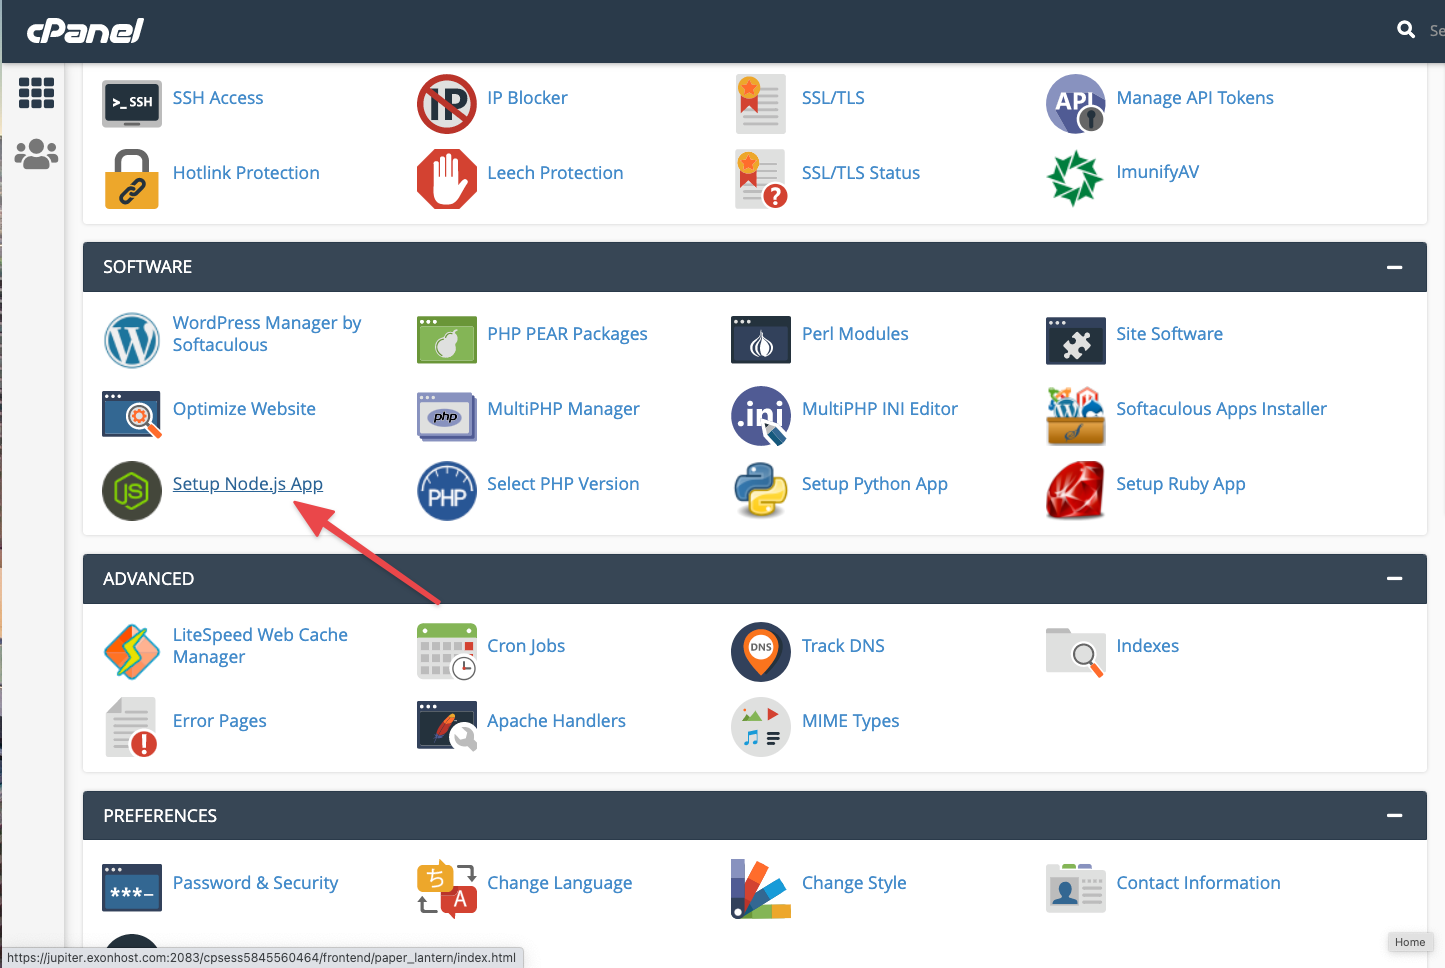
We'll run both shop and admin using the cPanel NodeJs application in this step.
To do that at first go to the NodeJS section from your cPanel,
For shop,
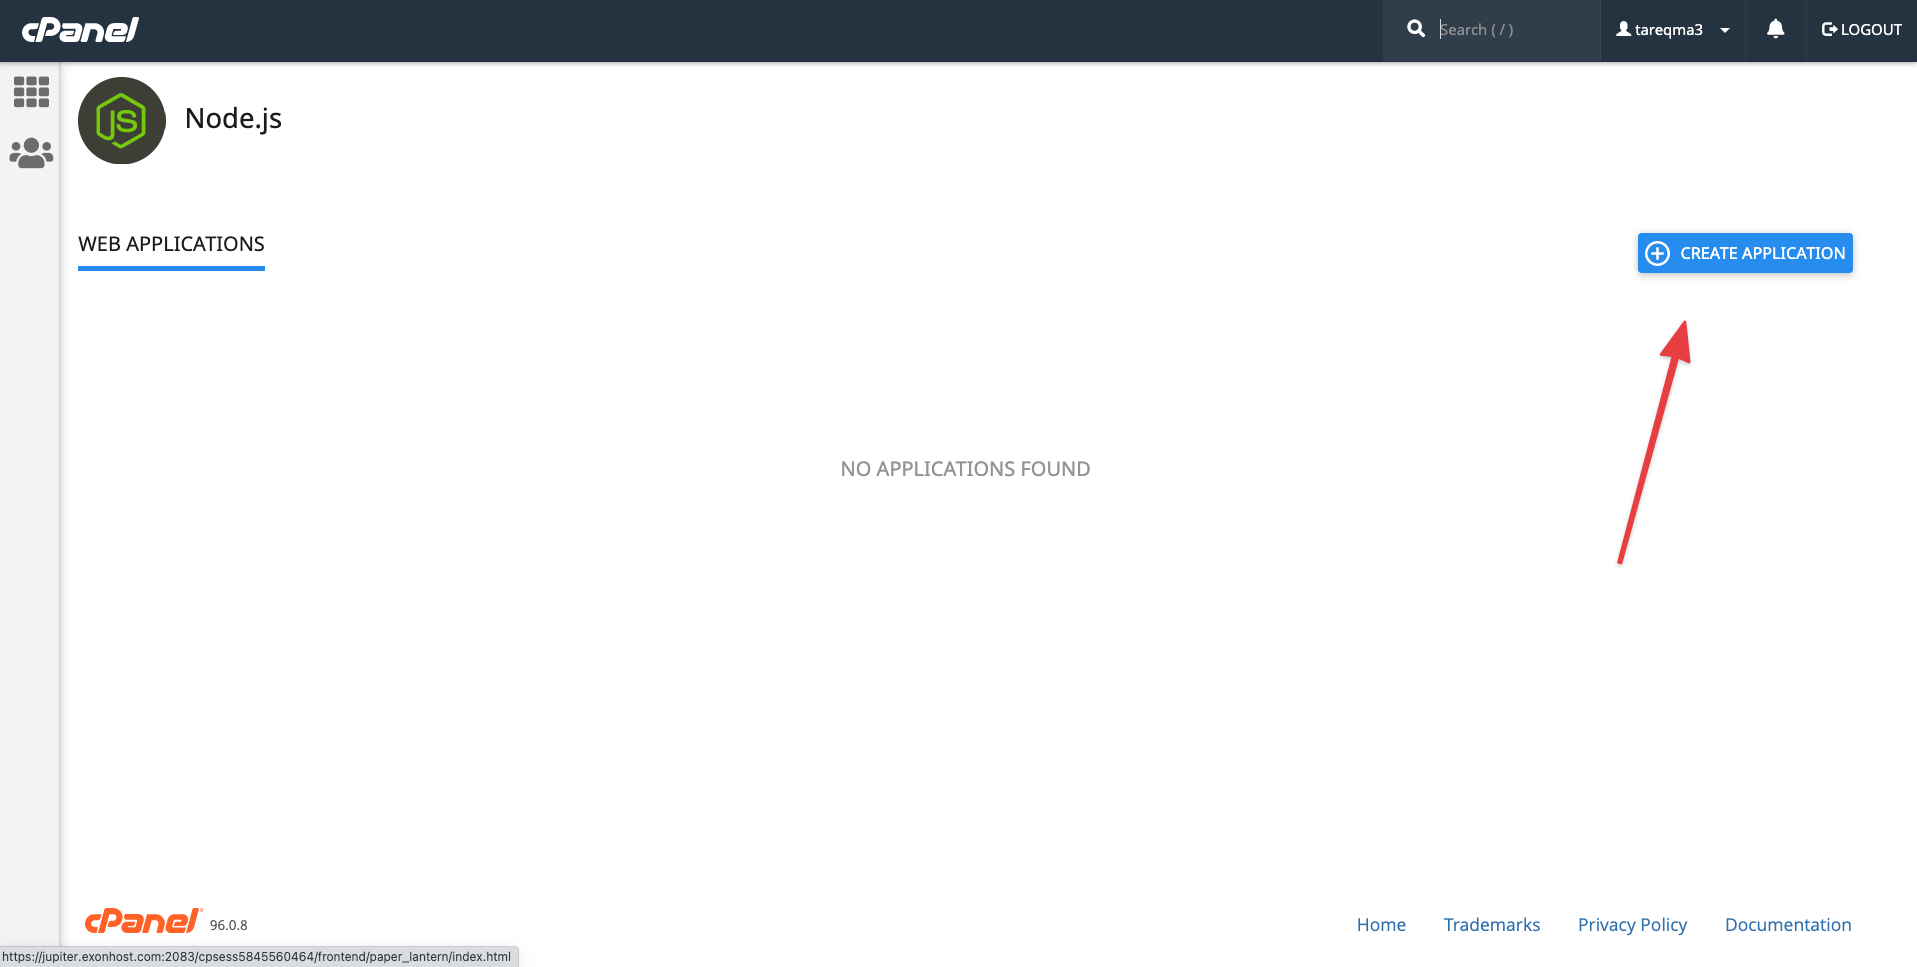
Now,
- Select NodeJS version
- Make environment
production. - Set Application Root
- And application startup file as
server.js
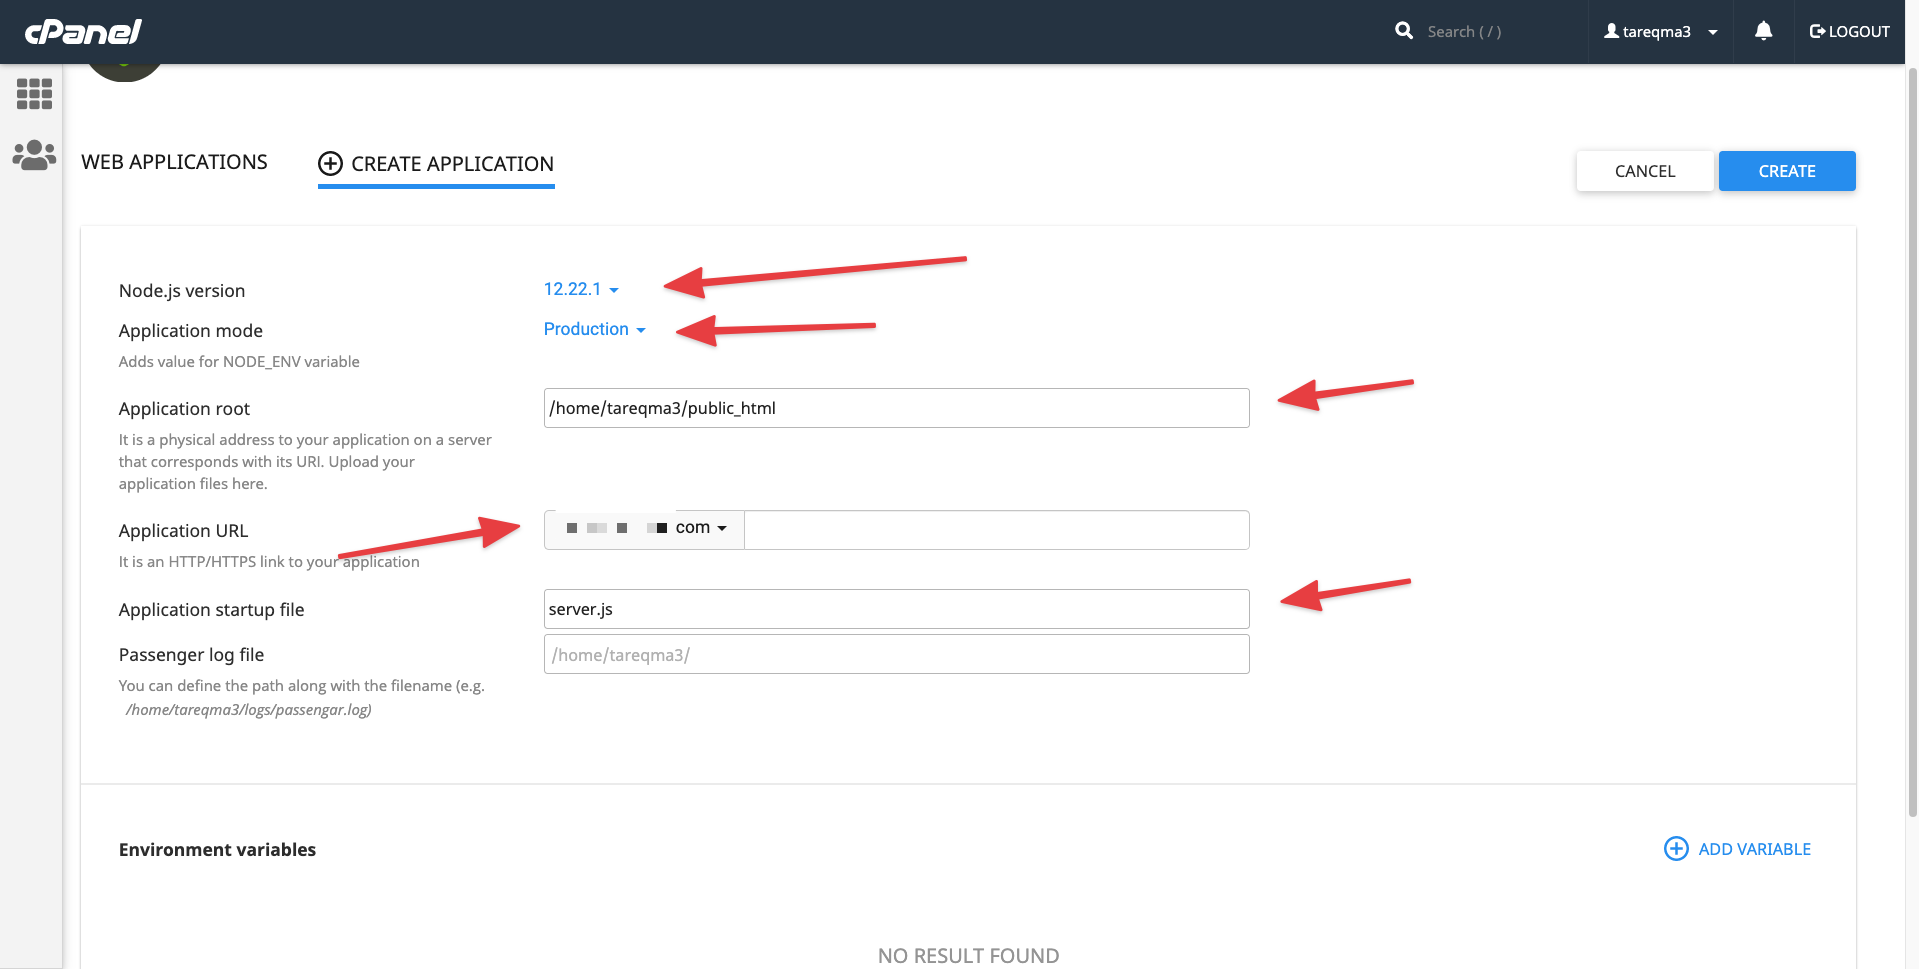
You can get the Application Path from your cPanel file manager

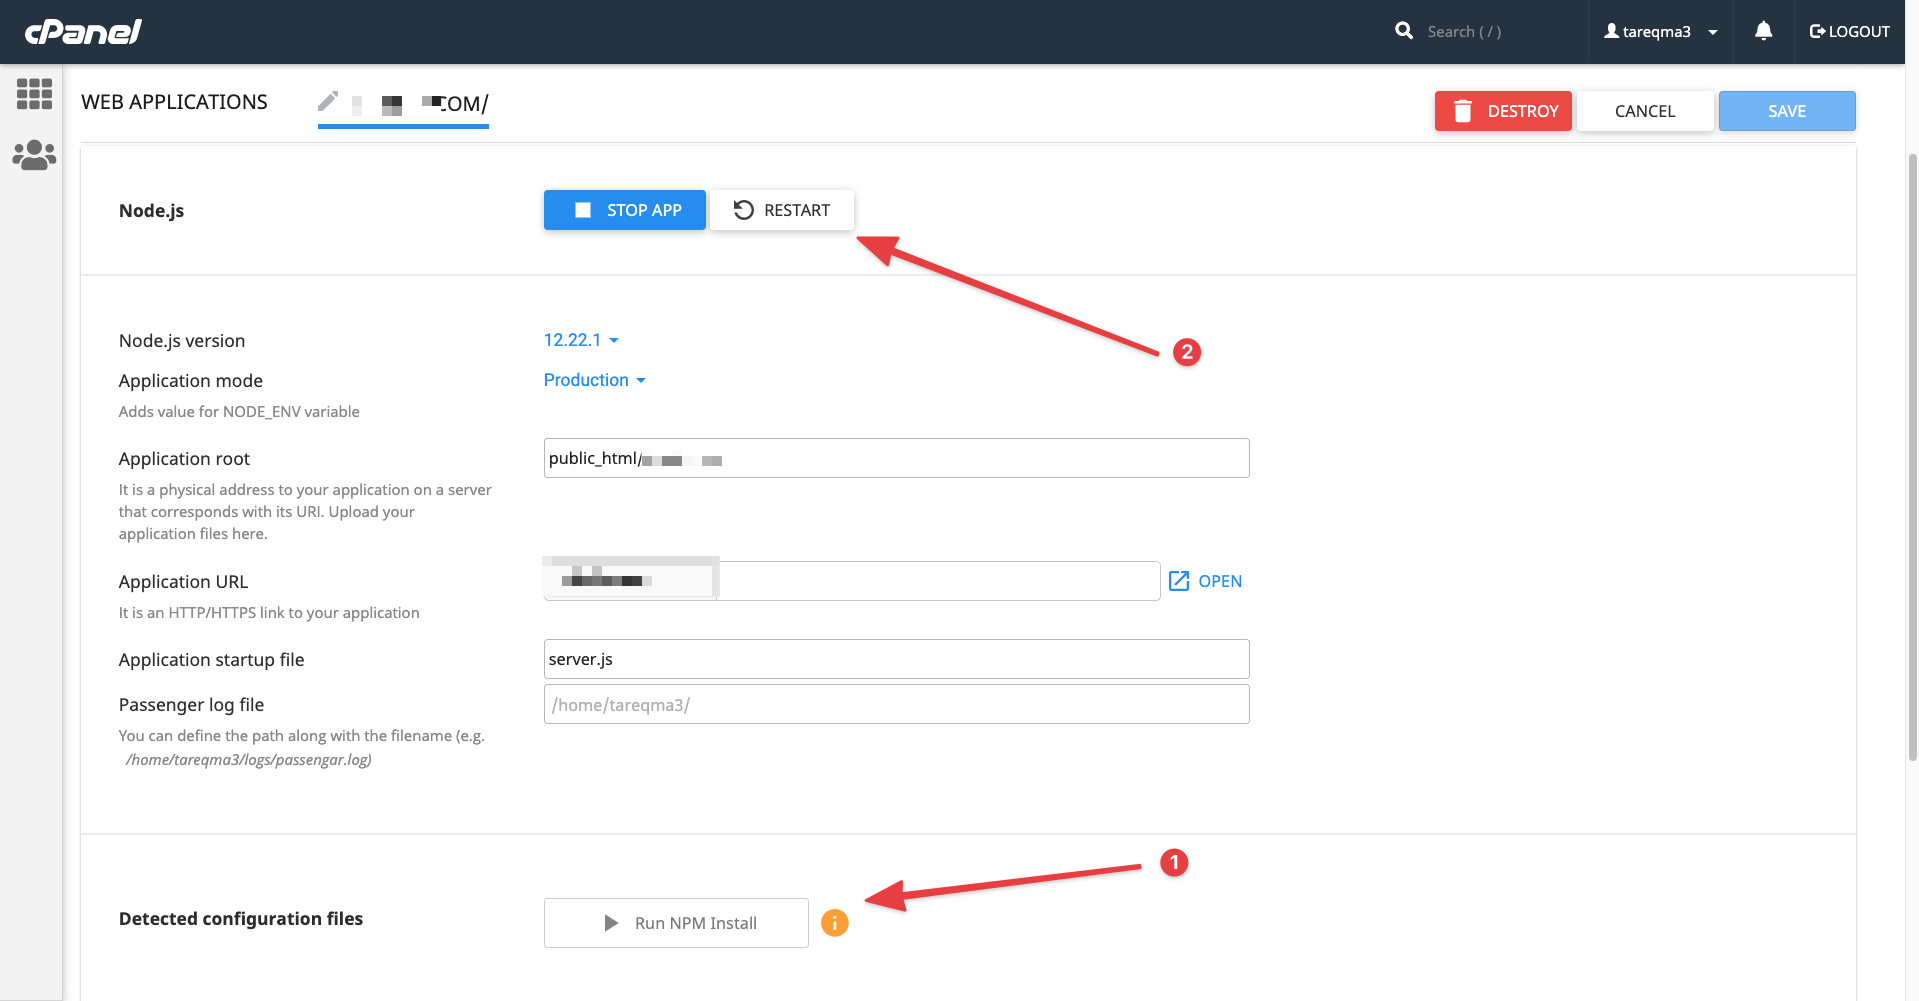
After create NodeJS app, install all the packages and restart the app,
For admin,
Similarly, create a another NodeJS application for admin with admin subdomain and admin subdirectory
After installing and run both NodeJS application, you can access your domain to check PickBazar,
Thank You!